How to Create Animations in Clipcat Templates (Fade In, Zoom In, and More)
Contents
Animations add life to videos. Whether it’s a simple fade-in or a cheeky bounce, adding animation to your video’s text or images can make your content feel more vibrant and engaging.
Let’s compare the same scene—first without animation, then with animation:
Without Animation

With Animation

The one with animation definitely grabs attention better and makes the content look more interesting and engaging!
In Clipcat, you can add animations to scenes using keyframes, which give you control over how an object moves, fades, or zooms across the screen. Once you understand how keyframes work, you’ll be able to create all kinds of animations—from subtle transitions to bold, eye-catching movements.
In this guide, I’ll walk you through how to create animations in your Clipcat templates—with examples like fades, zooms, slides, and more. If you’ve been wanting to make your Clipcat templates look a bit more dynamic using animations, keep reading!
Understanding How Animations Work in Clipcat
Animations in Clipcat are defined for each object using keyframes. A keyframe tells Clipcat, "At this point, this is the style or position of the object." By adding at least one keyframe and adjusting the property values, you can animate the object from one state to another—for example, from invisible to visible (like a fade-in) or off-screen to on-screen (like a slide-in).
Here’s a list of property values that you can adjust:
- Width
- Height
- Left
- Top
- Scale
- Opacity
- Rotate
- Background size
- Background position
- Delay
- End delay
- Duration
- Easing
How to Create Animations in Clipcat Templates
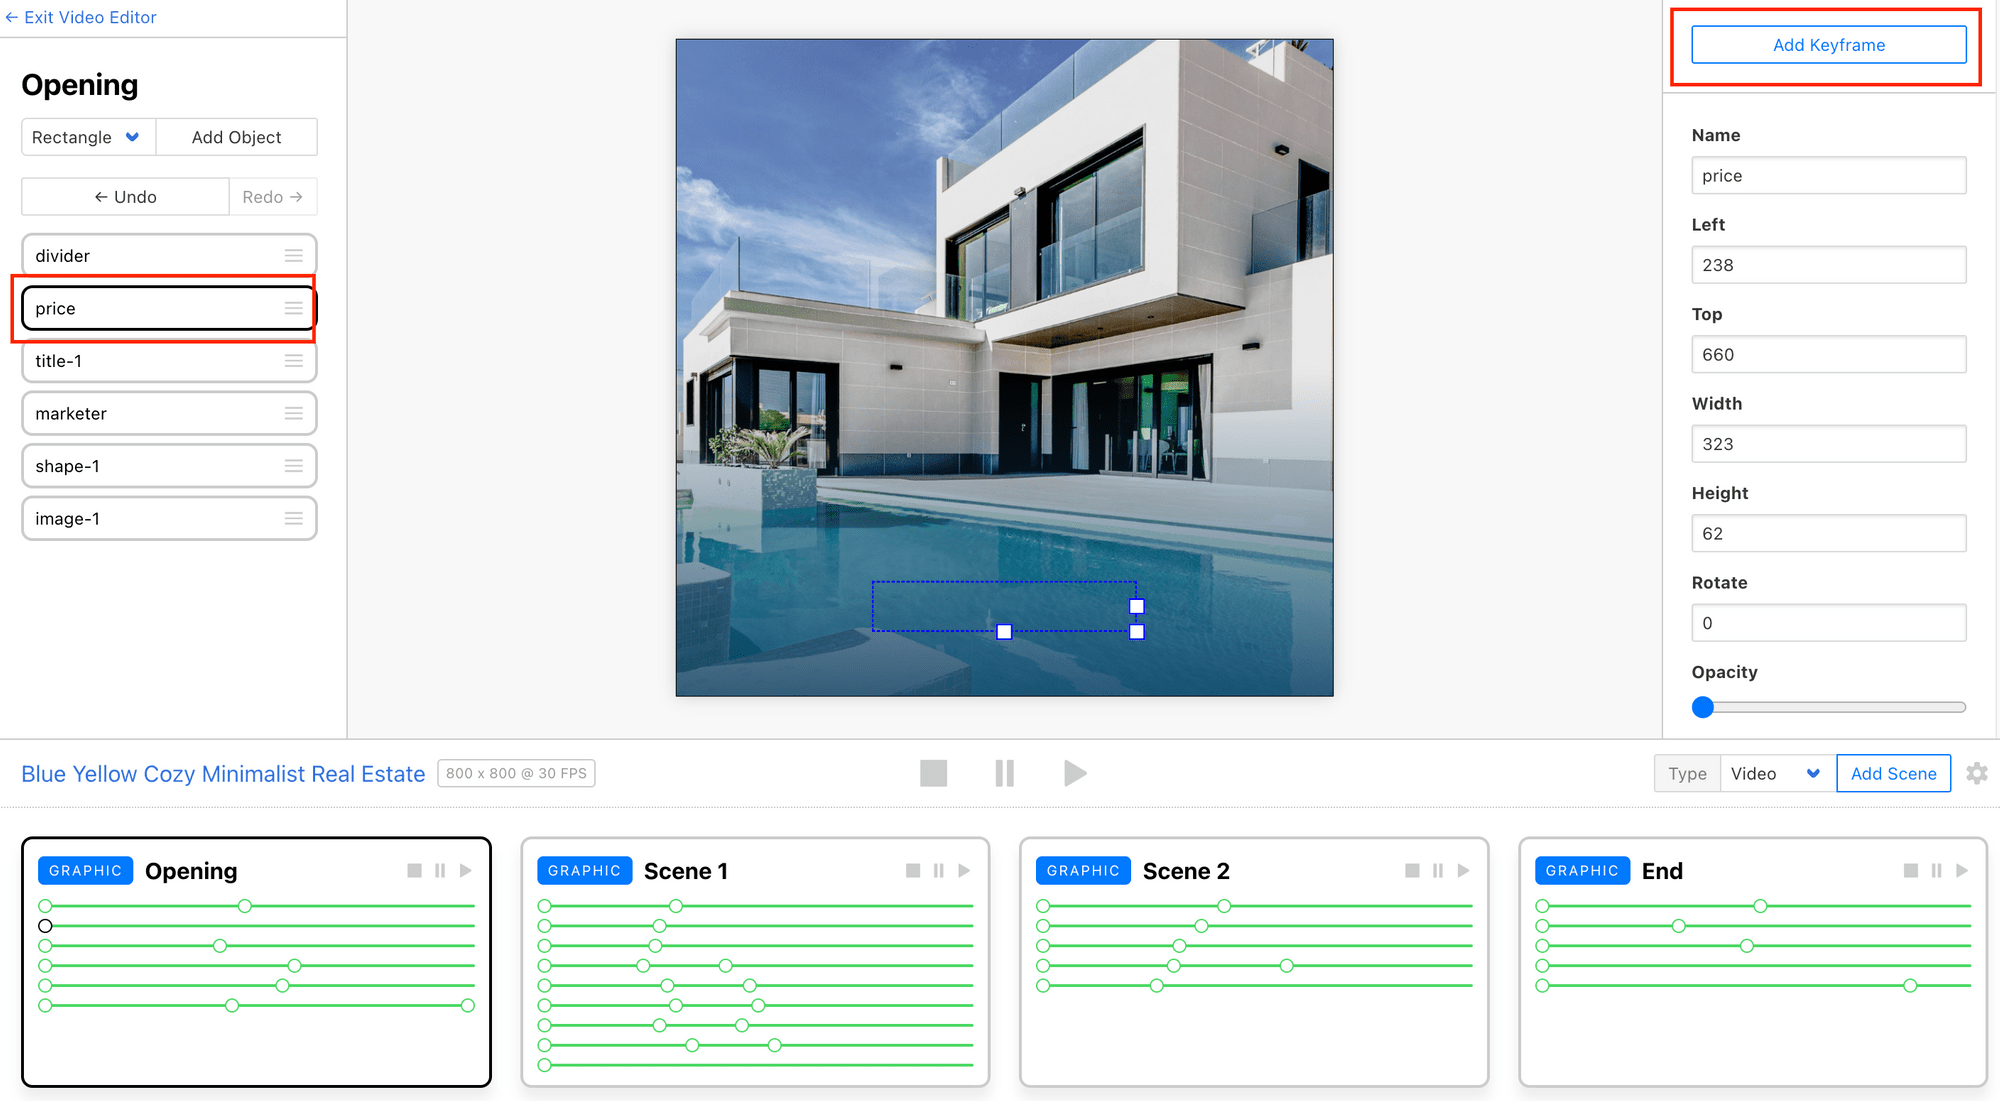
To add a keyframe, in your template editor, click on the object, and then click “Add Keyframe” :
Adjust the property values to achieve different animation effects:

Once you get the hang of how keyframes work, it becomes really fun to experiment. Let’s go through some common animations you can create in Clipcat and the exact settings you'll need to replicate them!
🐱 Meow Memo: It’s a good idea to first decide the duration of each scene before adding objects and keyframes. For all the examples below, we’ll set the background object to a duration of
2000, which makes each scene 2 seconds long.
1. Fade In/Fade Out

Fade-ins are perfect for smooth, subtle entrances. All you need to do is animate the opacity from 0 to 1.
Object (initial state):
- Opacity:
0
Keyframe 1:
- Opacity:
1 - Duration:
1000 - Easing:
linear
For a fade-out, just do the reverse—make the object gradually disappear by reducing the opacity from 1 to 0.
Object (initial state):
- Opacity:
1
Keyframe 1:
- Opacity:
0 - Duration:
1000 - Easing:
linear
🐱 Meow Memo: When applying animations to your actual project, don't be afraid to experiment with different property values!
2. Zoom In/Zoom Out
Zoom-ins are great when you want something to grab attention as it enters. To create that "coming forward" effect, we can adjust the object’s scale.
Object (initial state):
- Width: template width
- Height: template height
- Font size:
1(start small for dramatic effect) - Text Align:
center - Vertical Align:
center - Text Fit:
false
Keyframe 1:
- Scale:
100 - Duration:
1000 - Easing:
linear
Zoom-outs work the same way but in reverse—start at a bigger size and shrink it down. If you want to create a smooth exit, add another keyframe to reduce the opacity.
Object (initial state):
- Width: template width
- Height: template height
- Font size:
100 - Text Align:
center - Vertical Align:
center - Text Fit:
false
Keyframe 1:
- Scale -
0.1 - Duration -
1000 - Easing -
linear
Keyframe 2 (Optional):
- Opacity:
0(to fade it out after the zoom out) - Duration -
100
3. Slide In/Slide Out

Slide-ins are a great way to bring in elements from off-screen. Just place the object where you want it to come in from (e.g., left side of the screen), add a keyframe, and set the final position of the keyframe (e.g., center of the screen).
Object (initial state):
- Left:
-200(off-screen)
Keyframe 1:
- Left:
250(on-screen) - Duration:
1000 - Easing:
linear
To slide out, you do the opposite—animate the object from its current position to somewhere off-screen.
Object (initial state):
- Left:
250(on-screen)
Keyframe 1:
- Left:
800(off-screen) - Duration:
1000 - Easing:
linear
4. Rotate In/Rotate Out

Rotation adds flair to how something enters the screen. If you want a playful or dramatic entrance, use this.
Object (initial state):
- Left:
-200(off-screen)
Keyframe 1:
- Left:
250(on-screen) - Rotate:
360 - Duration:
1000 - Easing:
linear
For rotate-outs, do the opposite.
Object (initial state):
- Left:
250(on-screen)
Keyframe 1:
- Left:
800(off-screen) - Rotate:
360 - Duration:
1000 - Easing:
linear
5. Pop In with Bounce
The “pop-in” effect is perfect when you want something to appear with energy! It’s quite similar to a slide-in, but with a different easing style.
Object (initial state):
- Left:
-200(off-screen)
Keyframe 1:
- Left:
250(on-screen) - Duration:
1000 - Easing:
easeoutbounce
6. Pulsing
Pulsing creates a repeating zoom effect, like the object is “breathing”. You can create this animation by scaling the object up and down across a few keyframes.
Object (initial state):
- Nothing specific to follow
Keyframe 1:
- Scale:
1.1 - Duration:
500 - Easing:
linear
Keyframe 2:
- Scale:
1 - Duration:
500 - Easing:
linear
Keyframe 3:
- Scale:
1.1 - Duration:
500 - Easing:
linear
Keyframe 4:
- Scale:
1 - Duration:
500 - Easing:
linear
🐱 Meow Memo: Since the scene has a total duration of 2 seconds and there are 4 keyframes, each keyframe is set to a duration of
500milliseconds.
7. Floating
Floating animations give a soft, drifting feel. The settings are quite similar to pulsing but instead of changing the scale, you adjust the position of the object across multiple keyframes.
Object (initial state):
- Top:
200
Keyframe 1:
- Top:
180(moving up) - Duration:
500 - Easing:
linear
Keyframe 2:
- Top:
200 - Duration:
500 - Easing:
linear
Keyframe 3:
- Top:
180 - Duration:
500 - Easing:
linear
Keyframe 4:
- Top:
200 - Duration:
500 - Easing:
linear
8. Reveal
Reveal animations are great for making text appear letter-by-letter or line-by-line. This one needs a bit more patience—you need to use a separate object for each letter and adjust their opacities to create this effect.
Do this for each letter…
Object (initial state):
- Opacity:
0
Keyframe 1:
- Opacity:
1 - Duration:
100(e.g.,100for the first letter,200for the second,300for the third, and so on) - Easing:
linear
🐱 Meow Memo: The shorter the duration, the faster the reveal, and vice versa.
Combining Multiple Effects on One Object
You can get creative and combine the animations above into one to make your content feel more dynamic. Maybe the text can slide in and fade in at the same time, the product image can zoom in and rotate slightly, or the CTA button can pop in with a delay. In Clipcat, you can combine multiple animations on a single object by modifying more than one property across your keyframes.
Let’s say you want to make a "Slide In + Fade In" combo. Here’s how:
Object (initial state):
- Left:
-200(off-screen) - Opacity:
0
Keyframe 1:
- Left:
250(on-screen) - Opacity:
1 - Duration:
1000 - Easing:
linear
Boom—now the text fades and slides into view at the same time!

💡 Tips for Mixing Animations:
- Start simple—combine just 2 properties first (e.g. opacity + scale).
- Use
easeOutBackoreaseOutBouncefor fun effects like pop-ins. - Keep your durations and easings consistent to avoid jerky transitions.
You can get really creative with this! And since Clipcat lets you preview everything in real time, it’s easy to experiment until you get that perfect look and feel.
What’s Next
Now you’ve got the basics on creating animation effects in Clipcat templates! Whether you’re making explainer videos, marketing clips, or product videos, these techniques can help make your videos more dynamic and engaging.
The best way to create different animations is to experiment. Try combining different effects, tweaking durations, and playing around with easing styles until you find what works best.
🐱 Meow Memo: Don’t want to create templates or animations from scratch? Check out Clipcat’s Template Library and start with a pre-made template with just a few clicks!